Data is not always readily formatted for you to work with. For example, when you import data from an external application, the formatting could be completely different to what you require. The first and last names, addresses, telephone numbers, and or email addresses in a customer or employee data could be contained in one column in continuous text rather than in separate columns. You may need to split text in Excel for various reasons. For example, to sort the data by first or last name or by an address. Similarly, you may need the data to create a pivot table and want separate column headings as pivot table fields.
In this post, I will show you how to separate text in Excel using three easy methods which are:
- The Text to Columns tool
- Excel text formulas
- The Flash Fill tool
1. Split Text in Excel using Text to Columns
Text to Columns is a great tool which allows you to split text in Excel into multiple columns very easily. The Text to Columns tool in Excel allows you to use a common delimiter character to separate text in Excel. A delimiter character is normally a comma, space, semi-colon or a tab but can be any character. The delimiter character shows Excel exactly where to split the text.
Let’s now look at a couple of examples of how to use Text to Columns to split text in Excel.
Split Names into First and Last Name

In this example, there is a list of first and last names contained in one text string in column A. The goal is to split the first and last names and put them in columns B and C.
Step by Step Instructions
Here are the steps to do this.
- Select the dataset that you want to split. In this example, I select the range A2:A7.
- From the ribbon, click on the Data tab and under the Data Tools group click on the Text to Columns button.

- This opens the Convert Text to Columns Wizard. There are three steps to complete. In the first step, select the Delimited option. (This is the default option). The delimited option allows you to split text based on where there is a comma, space, tab, semicolon, or any other character. Click on Next.

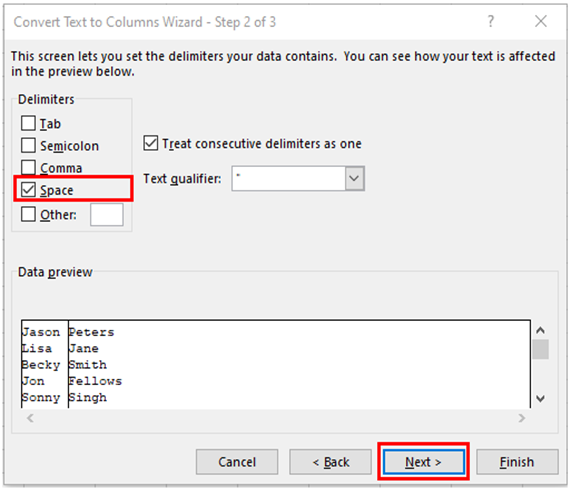
- In step two of the wizard, select the Space checkbox as the delimiter under Delimiters. If you think there may be double/triple consecutive spaces between the names, then put a checkmark against Treat consecutive delimiters as one. Click on Next.
- In step three, under Column data format, leave the setting as General. You need to enter the destination cell in the Destination field. In my example, I want to enter the names starting from cell B2, so I select this cell. If you don’t enter a destination cell, it will overwrite the existing dataset with the first name. The second name will go in the next column. Finally, click on the Finish button.

- The data in column A is now split with the first names in column B and the last names in column C.

Points to Note
There are a couple of points to note when you use Text to Columns to separate text in Excel.
- If the names have initials or middle names, then this technique might not work correctly. It works well when there is just a first and last name.
- The results you get from using Text to Columns is static. This means that if there are any changes to the original data, you will have to repeat the whole process again.
Split Email Addresses into Usernames and Domain Names
You can also specify your own delimiter to split text. Let’s look at an example of how to do this.

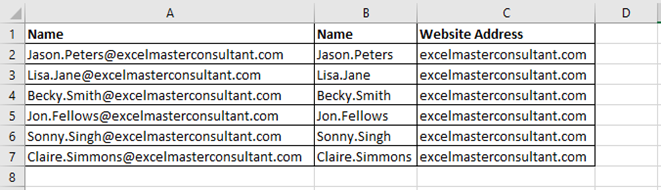
In this example, there is a list of email addresses and I want to split these into usernames and domain names. I can do this by specifying the @ sign as a delimiter. The names before the @ will become the usernames and the text after it will become the domain names. The steps to achieve this is very similar to the first example where I split the first and last names.
Step by Step Instructions
Here are the step by step instructions on how to do this.
- Select the dataset that you want to split. In this example, I select the range A2:A7.
- From the ribbon, click on the Data tab and under the Data Tools group click on the Text to Columns button.

- The Convert Text to Columns Wizard will open. In the first step of the wizard, select the Delimited option. Click on Next.

- In the second step, select Other under Delimiters and then enter the @ sign in the field next to it. Deselect all other delimiter options. Click on Next.

- In the final step, keep the setting as General under Column data format. Enter the destination cell in the Destination field. In my example, I want to enter the usernames in cell B2, so I select this cell. Finally, click on the Finish button.

- The usernames are now in column B and domain names in column C.
2. Split Text in Excel using Excel Formulas
Another way you can separate text in Excel is by using the LEFT, FIND, LEN and RIGHT functions. These functions are called text functions because they manipulate text in a cell. Formulas which contain text functions have one big advantage over the the Text to Columns tool. As mentioned earlier, Text to Columns produces static results which means that when the original source is changed, the results stay the same. The advantage of using formulas over Text to Columns is that it gives dynamic results. This means that when the source data changes, so do the results of the formula.
Before I show you how to use these functions to separate text, it is important to understand what each of these text functions does. The table below explains what the goal is for each function, their syntax and what their arguments mean.
| FUNCTION | AIM | SYNTAX | ARGUMENTS |
|---|---|---|---|
| LEFT | To extract characters from the left side of a text string | =LEFT(text, [num_chars]) | text – The text you want to use to extract the characters from the left side num_chars – This is optional. The number of characters you want to extract from the left side |
| FIND | To find the location of a character in a text string | =FIND(find_text, within_text, [start_num]) | find_text – The character you want to find in the text string within_text – The text string to search in start_num – This is optional. The starting position in the text string to search |
| LEN | To get the length of a text string | =LEN(text) | text – The text to use to calculate its length |
| RIGHT | To extract characters from the right side of a text string | =RIGHT(text, [num_chars]) | text – The text you want to use to extract the characters from the right side num_chars – This is optional. The number of characters you want to extract from the right side |
Split the First and Last Names using Text Functions
I will use the same data as the one I used earlier to split the first and last names using the Text to Columns tool.
Extracting the First Name
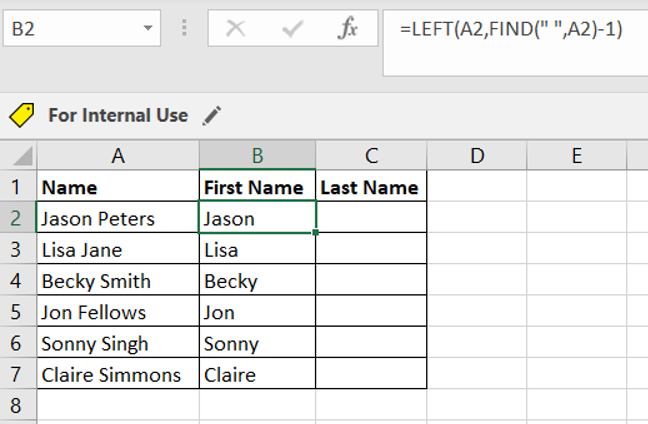
In cell B2 I created a formula which extracts the first name. The formula is:
=LEFT(A2,FIND(” “,A2)-1)
The FIND function finds the first space character between the first and last name in cell A2. The first space is located in position 6 after “Jason”. The LEFT function then extracts all the characters before the space character. The -1, at the end of the formula, removes the space character located in position 6. Finally, I copied the formula down to cell B7.
Extracting the Last Name

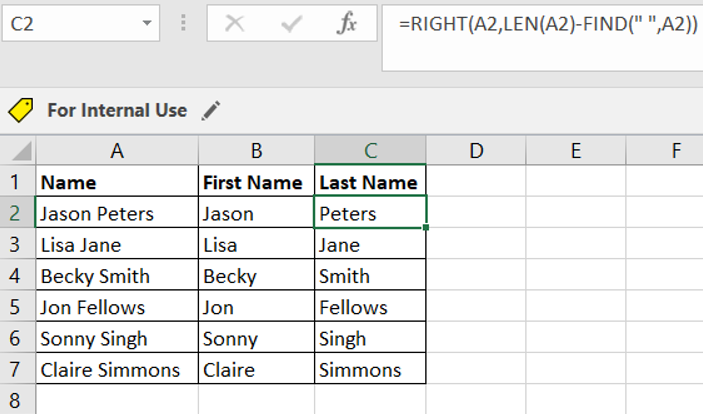
In cell C2 I created a formula to extract the last name which is:
=RIGHT(A2,LEN(A2)-FIND(” “,A2))
The FIND function is used to get the position of the space character after the first name “Jason”. In this example, it is in position 6. It then subtracts this number from the length of the text given by the LEN function. This returns the number of characters in the last name. The RIGHT function is then able to extract the last name. Finally, I copied the formula down to cell C7.
3. How to Split Text in Excel using Flash Fill
Flash Fill is a data tool that will guess the pattern of what you are typing in a few rows and then fills the rest of the data for you. It was introduced in Excel 2013. Flash Fill will save you lots of time in data entry. Flash Fill works automatically after entering a few examples, if enabled in Excel options. It will show a preview in light grey and then you can accept the results by pressing Enter on your keyboard.
Where is Flash Fill Located in Excel?

The Flash Fill button is in the Data tab of the Excel ribbon, under the Data Tools group.

It can also be found in the Home tab under the Editing group of the Excel ribbon. Click on the Fill button and a shortcut menu will appear. From the menu click on Flash Fill.
There are three ways you can use Flash Fill to separate text in Excel. These are by:
- Entering the text manually until Excel recognises a pattern
- Using a keyboard shortcut
- Using the mouse
For each method, I will use the same dataset as before and extract the first and last names from column A and put them in columns B and C.
Using Flash Fill to Separate Text in Excel by Entering Text Manually
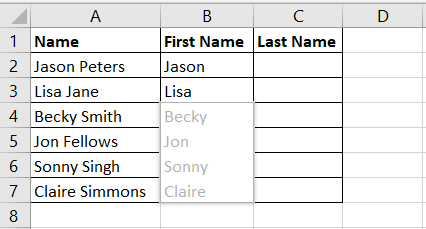
To extract the first names, I entered the first two names in cell B2 and B3. Flash Fill automatically recognises the pattern and previews the next entries in light grey.

If you are happy with the preview, then just press Enter on your keyboard and the remaining rows will be filled.

Similarly, to extract the last names, follow the same process as when you extract the first name. In this example, I entered the last names in cells C2 and C3 and then Flash Fill recognises the pattern. If you are happy with the preview Excel shows, then just press the Enter button on your keyboard.
One thing to note is that Flash Fill cannot fill upwards. If you start entering data in the middle of the column, then Flash Fill will fill downwards and not up. To overcome this, you can click the Flash Fill button, either from the Data tab or the Home tab in the ribbon, as mentioned earlier. By doing this, the whole column will be filled.
Using the Flash Fill Keyboard Shortcut to Separate Text in Excel
There is also a keyboard shortcut for Flash Fill to split text. The steps to use the keyboard shortcut are as follows.
- Type the example data.
- Select all the cells in the column you want to fill, including the example data.
- Press Ctrl + E on your keyboard.
Using the Mouse to Split Text
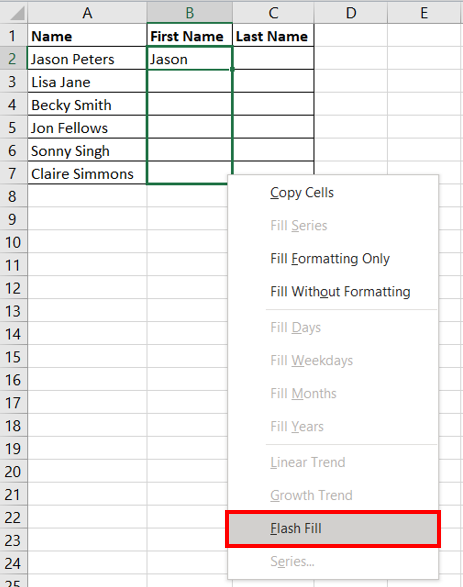
The third method to use Flash Fill to split text in Excel is by using the mouse. To do this, follow these steps.
- Type the example data. In this example, I typed the name “Jason” in cell B2.

- Right-click the fill handle which is located on the bottom right of the active cell and drag the mouse down to the bottom row.
- Release the right-click and then select Flash Fill from the menu.
4. Flash Fill has filled all the the first names in column B. You can then follow the same steps to split the last name.

So there you have it. This is a very comprehensive post which shows you three great ways on how to split text in Excel. I hope you enjoyed this post and found it helpful. If you did, then please enter your comments and feedback in the comments section below. I would love to hear from you.
Do you Want to Learn more Excel Tips, Hints and Tricks?
Splitting text in Excel using the Text to Columns tool, text formulas and Flash Fill is just one great way to save time and effort in Excel. If you want to learn more Excel tips and tricks then you must get Excel Bible for Beginners: Microsoft Excel Book Containing the Best Excel Tools, Tips and Shortcuts you Need to Know.
This Excel book will help you work smarter, save time, and become more productive by learning all the best hints, tips and tricks Excel has to offer. This book will show you how to:
- Hide specific text in a worksheet
- Quickly insert multiple rows using shortcut keys
- Shift between lots of open Excel windows
- Repeat your last actions using just one keystroke
- Get quick access to your favourite command buttons
- Use the Camera tool
- Quickly remove duplicate entries using the Advanced Filter tool
- Format dates from US to UK format and vice versa
- Make Excel speak back at you
- Automatically populate data
- Change data from column format to row format and vice versa
- Make your worksheets very hidden
- Analyse large datasets using Pivot Tables
- Create two-way lookups
- Access hidden features that are not available in the ribbon
- Use some Excel formulas and functions to manipulate data quickly
- And much more!
Here are just some reviews from Amazon for this book.


So what are you waiting for? To learn more about this book or to purchase it from Amazon, then press either of the button below. If you would like the eBook version, then you can purchase this from my shop.
