In the intricate world of Excel mastery, ensuring the precision of your data is non-negotiable. If you’ve ever wondered, ‘How do you turn on spell check in Excel?’ you’re in the right place. Spell check isn’t just a feature however; it’s your guardian against typos and errors. It therefore ensures your spreadsheets exude professionalism. Join us on a journey to demystify the process and therefore elevate your Excel game. So let’s dive into the simple yet impactful steps to harness the full potential of spell check in Excel!”
Understanding Spell Check in Excel
Spell check is a powerful tool designed to review your spreadsheet for spelling and grammatical errors. In other words, it ensures that your data remains accurate and professional. It scans the text in your cells and offers for corrections, therefore allowing you to maintain a polished and error-free worksheet. So read on to discover how do you turn on spell check in Excel.
How do you Turn on Spell Check in Excel?
Locating the Excel spell check feature is a breeze. To turn it on, navigate to the “Review” tab in the ribbon at the top of the Excel window. In the ribbon, you’ll find the “Spelling” button – the key to unlocking the spell check functionality. Similarly, you can use the keyboard shortcut F7 to initiate the spell check process.

Using the Excel Spell Check
Let’s delve into the step-by-step process to answer the question of how do you turn on spell check in Excel?
- Open your Excel spreadsheet.
- Go to the “Review” tab in the ribbon.
- Click on the “Spelling” button or use the F7 keyboard shortcut.
- Excel will start scanning your worksheet for errors.
- If a potential error is detected, Excel will suggest corrections in the “Spelling” dialog box.
How Does the Excel Spell Check Work?
The spell check in Excel operates by scanning the text within cells against its built-in dictionary. When initiated, it inspects each cell containing text and compares it to the words stored in its dictionary. As a result, if it encounters a word that isn’t found in the dictionary, it flags it as a potential error.
For example, let’s consider a simple dataset:

Now, if we were to perform a spell check on this dataset:
- Navigate to the “Review” tab and then click on the “Spelling” button or use the F7 keyboard shortcut.
- Excel will start the spell check process and identify potential errors:
- “Februari” is flagged as it’s a misspelling of “February.”
- “Summery” is flagged as it should be “Summary.”
- The spell check dialog box will show suggestions for these flagged words:
- For “Februari,” Excel might suggest “February.”
- For “Summery,” Excel might suggest “Summary.”
- You can choose to ignore, add, change, or change all instances of these flagged words according to your preference.
Excel’s spell check doesn’t just look for spelling errors however; it also reviews contextual issues, such as repeated words or formatting inconsistencies within the text.
In our example, Excel flagged “Februari” because it’s not in its dictionary. By providing the suggestion “February” for instance, it guides the user to replace the misspelled word with the correct one.
Similarly, “Summery” is identified as a potential error, and Excel suggests “Summary” as the correct spelling, allowing the user to rectify the mistake.
To sum up, by understanding how do you turn on spell check in Excel, users can ensure the accuracy and professionalism of their data, correcting errors swiftly and efficiently.
The Spelling Dialog Box
The Spell Check dialog box in Excel consists of several sections and buttons. Each serves a specific purpose to help you review and correct spelling and grammatical errors in your worksheet. Let’s break down the different sections and buttons:
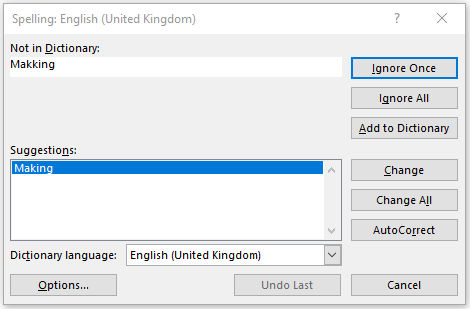
1. Not in Dictionary:
- This section lists words that Excel doesn’t recognize or considers as potential spelling errors.
- It therefore provides a quick overview of words that may need attention.
2. Suggestions:
- This section displays suggested corrections for the word currently being reviewed.
- As a result, you can choose a suggestion from this list to replace the identified error.
3. Ignore Once / Ignore All:
- Ignore Once: Skips the current instance of the flagged word without making any changes.
- Ignore All: Skips all instances of the flagged word throughout the worksheet without making any changes.
4. Add to Dictionary:
- Adds the currently selected word (from the “Not in Dictionary” section) to Excel’s custom dictionary.
- This is useful for adding words that are correct but not recognized by the default dictionary.
5. Change:
- Replaces the currently selected word (from the “Not in Dictionary” section) with the selected suggestion from the “Suggestions” section.
6. Change All:
- Replaces all instances of the currently selected word (from the “Not in Dictionary” section) with the selected suggestion from the “Suggestions” section throughout the worksheet.
7. AutoCorrect:
- Automatically corrects the currently selected word (from the “Not in Dictionary” section) with the suggested word in both the current cell and all instances throughout the worksheet.
- This is therefore a quick way to apply corrections without going through each occurrence individually.
To conclude, by understanding and mastering the spell check dialog box, you gain the ability to meticulously review and enhance the accuracy of your Excel data.
Other Points to Note About the Excel Spell Check
Below are some other key points to note when using the spell check in Excel:
Language Selection: Ensure that the correct language is selected for spell check. Excel allows you to set different languages for different parts of your document. Make sure the language setting corresponds to the language used in your data.
Proofing Options: Access additional spell check and grammar settings through the “Proofing” options in Excel. This can include options like checking uppercase words, checking for numbers, or ignoring words in uppercase for example.
Checking Across Sheets: Spell check typically checks one sheet at a time. If your workbook has multiple sheets however, you need to perform the spell check on each sheet separately.
Hidden and Filtered Data: Spell check does not automatically check hidden or filtered data. As a result, unhide or unfilter data before running spell check if you want to ensure a comprehensive review.
No Automatic Grammar Check: Excel’s spell check focuses primarily on spelling errors. It does not automatically perform a comprehensive grammar check. As a result, users need to review grammar manually.
Reviewing Comments and Headers: Spell check may not automatically review comments or headers/footers in your worksheet. Therefore, be sure to manually check these elements if they contain text that needs to be reviewed.
Add to Dictionary Considerations: When adding words to the custom dictionary, be mindful of proper nouns, technical terms, or industry-specific terminology that may not be in the default dictionary.
Ctrl + Click for Multiple Selections: In the spell check dialog box, you can use Ctrl + Click to select and make changes to multiple occurrences of the same word.
Now you know the Answer to the Key Question “How do you turn on spell check in Excel?”
In the world of Excel, where precision is paramount, the spell check feature emerges as an invaluable ally. By learning the answer to the question how do you turn on spell check in Excel and mastering its functionalities, you can elevate the quality of your spreadsheets. This ensures that your data is not only comprehensive but also error-free. So, embrace the power of spell check and let your Excel creations shine with perfection!
To conclude, I hope you enjoyed reading this tutorial on how do you turn on spell check in Excel? If you did, please leave a message in the comments section. I would love to hear from you.
Unleash Your Spreadsheet Passion With Excel Related Products to Buy!
Dive into a world where Excel isn’t just a tool—it’s a lifestyle! At my Excel shop, we’ve curated a collection of products that celebrate your love for spreadsheets and data mastery.
Discover our Exclusive eBooks:
Unlock the secrets of Excel with our meticulously crafted eBooks. Whether you’re a beginner seeking essential skills or an advanced user craving expert tips, our eBooks cater to all levels. Elevate your spreadsheet game and become the Excel champion you were destined to be.
Sip in Style with Excel Mugs:
Pour your favorite beverage into our Excel-themed mugs and as a result, let the world know you speak the language of formulas and functions. Each mug is a perfect blend of practicality and passion, therefore making your coffee breaks as productive as your Excel sessions.
Wear Your Excel Pride:
Express your love for Excel with our trendy T-shirts! From witty Excel puns to sleek designs, our apparel lets you flaunt your spreadsheet prowess wherever you go. Be the talk of the office or the star of virtual meetings with our Excel-inspired fashion.
Your Journey Starts Here! Click Now to Explore the Excel Shop
Immerse yourself in a world where Excel isn’t just a software; it’s a lifestyle. Click below to browse our exclusive collection and bring the magic of Excel into your everyday life. Elevate your skills, upgrade your style, and let the world see your passion for precision!
Shop Now: Click here to visit the Excel Shop or click on any item below to find out more about it.
Etsy Shop: API reponse should be HTTP 200API Error Description: Shared secret is required in x-api-key header. Etsy Shop: API reponse should be HTTP 200
API Error Description: Shared secret is required in x-api-key header.
