
This tutorial will teach you how to remove duplicate rows in Excel. Removing duplicate entries in a dataset is a common task among Excel users. Duplicate rows in Excel occur when you are combining different tables together to make one big dataset. Secondly, they can also occur when people are using a shared Excel file which they work on at the same time. Duplicate rows can cause many issues such as giving wrong results if you are using formulas to make calculations. Removing duplicate rows in Excel can be a time consuming and mundane task.
In this post, I will show you two methods on how to delete duplicate rows in Excel which will save you tons of time. The two methods are by using:
- The Remove Duplicates button in the Excel ribbon
- The Advanced filter button in the Excel ribbon
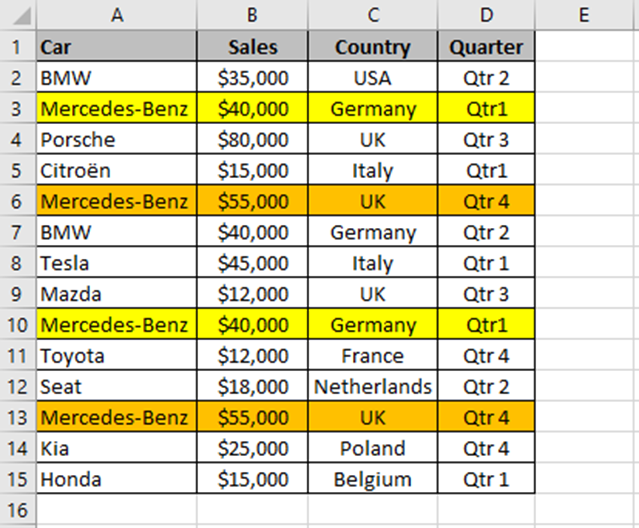
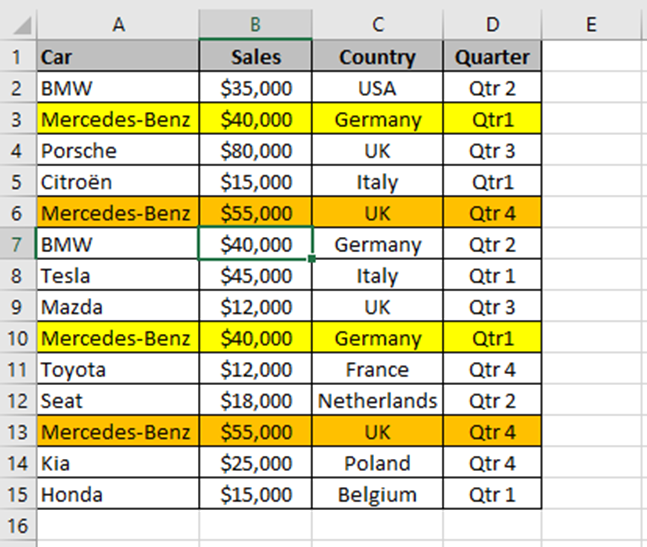
I will show you how to remove duplicates using both methods with the above dataset. The data shows a list of car sales, which country the car was sold in, and in which quarter. Rows 3 and 10 are highlighted in yellow as they are duplicate entries. Similarly, rows 6 and 13 are also duplicate entries and have been highlighted in orange.
The Remove Duplicates Button to Remove Duplicate Rows in Excel
In order to delete duplicate rows in Excel using the Remove Duplicates button in the ribbon, then please follow these steps.
- Select any cell in the dataset. In this example, I have selected cell B7. When you select any cell in the dataset, Excel automatically determines the range in the next step.

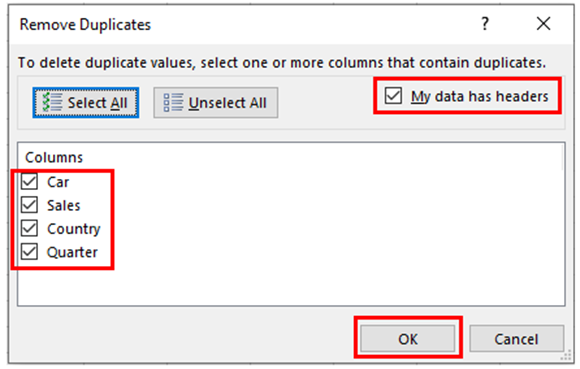
- From the ribbon, click on the Data tab and under the Data Tools group click on the Removes Duplicates button.

- The Remove Duplicates dialog box will appear. If your data has column headers, then check the My data has headers checkbox. This means that the first row will not be considered for removing duplicates. You can also check which column headers you want to compare for duplicates under Columns. In my example, I want to check all the column headers, so I have checked all the column header checkboxes. Finally, click on the OK button.
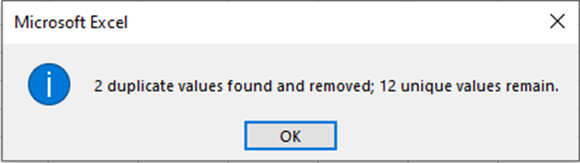
- Excel will delete the duplicate rows and a dialog box will appear showing you firstly, how many duplicate values were found and secondly, how many were removed. It also displays how many unique values remain. You can then click on the OK button.
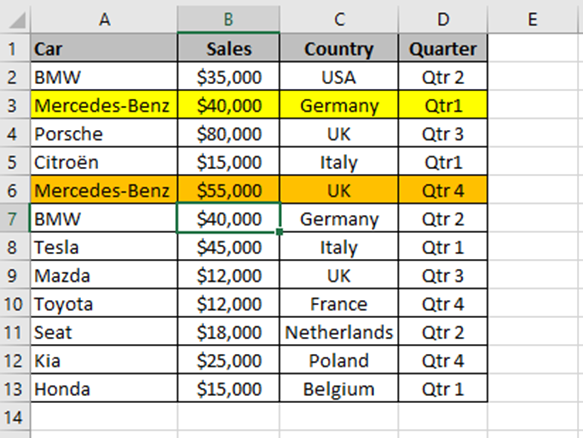
- The duplicate entries have now been removed.
The Advanced Filter to Remove Duplicate Rows in Excel
You can also remove duplicate rows in Excel using the Advanced button in the ribbon. This method filters duplicate values and copies the unique values to a different location. Here are the steps to do this.
- Select any cell in the dataset. In this example, I have selected cell B7. Excel will automatically determine the range when you click on the Advanced button.
- From the ribbon click on the Data tab. Under the Sort & Filter group click on the Advanced button.

- The Advanced Filter dialog box will appear. Select Copy to another location so the unique values will appear in a different location in the worksheet. The List range will automatically be populated. It is good practice however to check that the range of the data is correct. In the Copy to field, select the cell where you want the unique values to be copied to. In my example, I have selected cell F1. Ensure that the Unique records only check box is checked. This is the most important step. Finally, click on the OK button.

- Cell F1 now displays the unique values.

Microsoft Excel Book: The Excel for Dummies Book on How to Master Excel From scratch in 15 days to Land a Promotion and Increase your Salary
Learning how to delete duplicates in Excel is just one way to become more proficient in Excel. If you want to master Excel, save time at work, make your life easier and even get a pay rise then you must get my Microsoft Excel book. This Excel book, aimed for beginners, will unleash all the tools and features of Excel to take your skills to the next level. To learn more about this book and to buy it from Amazon, then please click either of the buttons below. You can also visit my shop where I have written a number of Excel books on a wide variety of Excel topics to help you on your Excel journey.
I hope you enjoyed this tutorial on how to remove duplicate rows in Excel. If you have any questions or feedback, then please leave a comment in the comment box below. As always, I would love to hear from you.
